Smart Track reports screen
This topic provides an overview of the Smart Track reports screen and all the settings and buttons on it. However if you require a step-by-step procedures on requesting Smart Track reports refer to How to request a historical Smart Track report and How to request a recurrent Smart Track report.
This feature requires option E10 Live location monitoring. If you do not have this option this screen is not available.
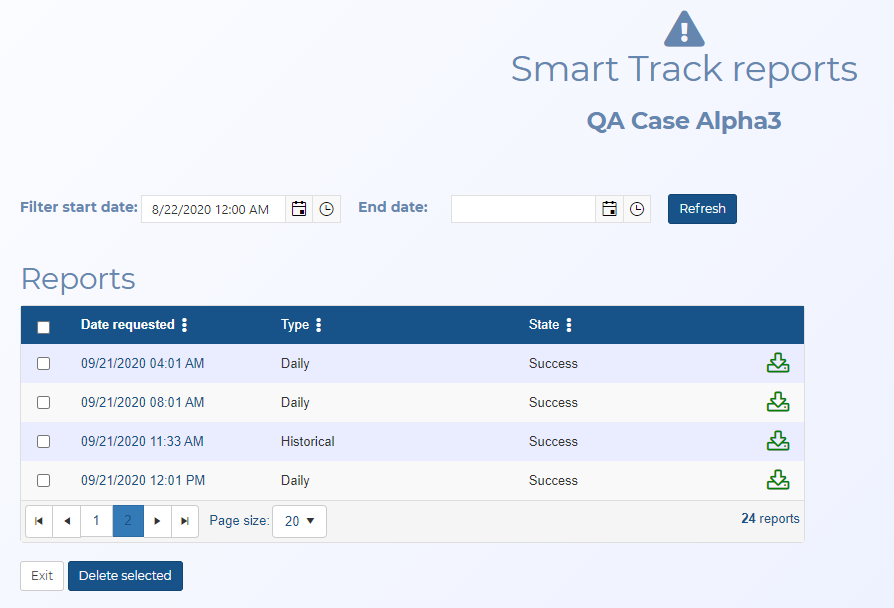
The Smart Track reports screen allows you to filter, download and delete all the daily, historical and recurring Smart Track reports.
You can also click the date in the Date requested column to view the report status on the Smart Track report status screen.

Click to open the ESPA analysis center screen. For a meaningful analysis it is recommended that the case includes the relevant locations, the people of interest along with their phone numbers and their CDR files. If you are analyzing tower dump or geofence data then the case requires the relevant locations and the files. When the ESPA analysis center screen opens it is automatically populated with the case details. For further information about this screen refer to ESPA analysis center screen.

This is only displayed if your case, person or phone number either contains an i-case, or has Smart track or real-time social media enabled. Click to open the Sentinel screen which allows you to monitor a person's activities on the surveilled network. For further information about this screen refer to Sentinel screen.
Select the start and end dates then click Refresh, to filter the Smart Track reports so that the ones that are of interest to you are displayed on the screen.
 Column header menu
Right-click on any column header in the table to display this menu.
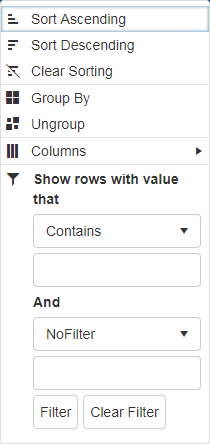
This menu allows you to perform the following:
- Sort ascending: click to sort the column text from A to Z or to sort numbers from smallest to largest.
- Sort descending: click to sort the column text from Z to A or to sort numbers from largest to smallest.
- Clear sorting: click to clear any sorting you have applied using Sort ascending or Sort descending.
- Group by: click to group the cases by the selected column.
- Ungroup: click to ungroup the cases by the selected column.
-
Columns: select to display a list of which columns you can display on this table.
-
 : use to filter further the results that are displayed in the table. You can filter based on the settings in that column and/or values that occur across the case row. When a filter is applied to a column the column header appears in colored italics.
 - Use the check-boxes if any are displayed for your selected column. These allow you to filter based on all the settings that are applicable to that column. For example, the Port column allows you to filter by the different port numbers that are available.
- Set up to two values that you can filter for using the drop-downs and the data entry field. For example, you could select "Contains" the value "Historical" to search for historical reports only.
- Click Filter when you have entered the required filter information.
- Click Clear filter to remove any filter from the column.

Click to download the selected report.
Click if you want to delete the reports you have the check-box selected for in the table above.
Click to close the screen and return to the Manage case screen.